QQ登录 会员登录 注册或点击登录代表您同意《素材之家用户协议》
欢迎来到素材之家
当前位置:首页 > 软件教程 > Illustrator教程 >

Illustrator 飘逸的丝带绘制

我们用Illustrator绘制飘逸的丝带,教程的步骤写的非常清楚,英文我就不给大家翻译了,感觉大家应该能看懂吧!!如果又看不懂的童鞋存在,本站还有中文版本的,具体链接:https://www.jb51.net/Illustrator/95501.html。站长和大家顺便一起学习下英文吧!都快忘光了!呵呵 Step 1 - draw the first part of the ribbon
A basic knowledge on how to use the pen tool and how to draw bezier curves is needed to get started with this tutorial.
Step 1 - draw the first part of the ribbon
Draw a curved line that looks similar to the illustration above. Hold down the shift key while dragging the handles in the last point of the curved line. Drag a vertical guide onto the curved line as shown in the picture above. To make it snap to the exact position, make sure that Smart Guides is checked (View > Smart Guides or command/control + U). Step 2 - break the curve into 2 parts
Because we'll have to apply different shades and we need to create depth into the ribbon, we need to cut the ribbon into different segments.
Step 2 - break the curve into 2 parts
Select the Scissors Tool and click on the location on the path as shown in the picture above. With the Smart Guides active you'll get the 'intersect' text when your cursor is at the right spot. Now the path is cut into 2 segments. Select both segments, hold down the shift + option/alt key and drag/copy the paths vertically as shown in the picture above. Step 3 - close the paths
Close the paths as shown in the picture below, so the ribbon exists of 2 segments. Select both segments, select the Rotate Tool and click while holding down the alt/option on the location as shown below in the picture, enter 180° and click the Copy button.
Step 3 - close the paths Step 4 - rotate and duplicate the 2 segments of the ribbon
Advanced users will probably just click on the exact location, hold down the alt/option and shift key while dragging the segment to the correct location as show in the picture below.
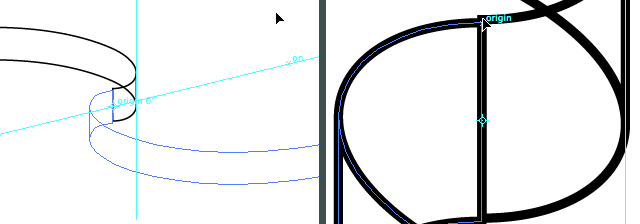
Step 4 - rotate and duplicate the 2 segments of the ribbon
Chances are that both segments don't perfectly match. Select the 2 new segments, zoom in, and drag them to the exact location. With Smart Guides still checked it'll snap and you'll see the word 'origin' appearing. Step 5 - merge the middle segments of the ribbon into 1 segment
Select the 2 middle segments of the ribbon and click on the "Add to shape" option in the Pathfinder palette. This way Illustrator will treat these parts of the ribbon as 1 object which will make it easier when we give this segment a fill.
  • 日期: 2013-08-01 16:55:12
  • 来源: 脚本之家
  • 版权 图像、字体及音频仅供参考i
    版权声明

    素材之家模板内容(包含但不限于版式、图片、音乐、字体等素材),来源于第三方分享者,其版权归原创作者拥有。若作为商业用途,请获取模板原作者授权或替换相应素材,相关字体以及人物肖像需版权方额外授权,请谨慎使用,素材之家不承担由此引发的一切版权纠纷。

    素材之家提供模板展示平台和网络服务,同时提供客服、内容整理、使用指导、储存等服务;仅供广大用户交流学习使用;对于用户在使用素材之家平台服务过程中自行上传的素材和作品,素材之家不具备审查其内容是否存在侵权等情节的能力。

    用户自行上传和使用素材等内容应遵守相关法律、法规,不得侵犯本网站及权利人的合法权利,情节严重者将依法追究其法律责任,素材之家不承担出现权利纠纷时的任何责任。

    素材之家对作品中含有的国旗、国徽等政治图案不享有权利,仅作为作品整体效果的示例展示,禁止商用。另外您必须遵循相关法律法规规定的使用范围和使用方式,禁止以任何形式歪曲、篡改。

    素材之家尊重知识产权,如知识产权权利人认为平台内容(包括但不限于用户自行上传分享的内容)涉嫌侵权,可通过邮件:tousu@isucai.com.cn提出书面通知,我们将及时处理。

您可能会喜欢的其他教程
ai怎么做彩色蜡笔字体? ai蜡笔文字设计技巧

ai怎么做彩色蜡笔字体? ai蜡笔文字设计技巧

ai怎么做彩色蜡笔字体?孩子喜欢使用蜡笔画画,想要设计一款蜡笔字体,感觉会很好看,该怎么设计这款字体嗯?下面我们就来看看ai蜡笔文字设计技巧...

ai 蜡笔字体 字体设计

AI怎么做漂亮的led描边文字? ai文字描边效果的设计过程

AI怎么做漂亮的led描边文字? ai文字描边效果的设计过程

AI怎么做漂亮的led描边文字?ai中想要设计一款漂亮的文字,该怎么设计呢?下面我们就来看看ai文字描边效果的设计过程,详细请看下文介绍...

AI 文字描边 描边效果 文字设计

ps怎么快速画虚线图形? ps彩色虚线图的画法

ps怎么快速画虚线图形? ps彩色虚线图的画法

ps怎么快速画虚线图形?ps中想要快速绘制虚线图形,比如虚线效果的心形,条形,圆形等等,该怎么绘制呢?下面我们就就来看看ps彩色虚线图的画法...

ps 虚线 虚线图形

AI怎么添加炭精笔效果?

AI怎么添加炭精笔效果?

AI是一款创建并编辑矢量图,插画处理ai的软件,那么怎么添加炭精笔效果呢?下面和小编一起看看吧...

AI 炭精笔

ps线条怎么断开和连接? ps断线效果的制作方法

ps线条怎么断开和连接? ps断线效果的制作方法

ps线条怎么断开和连接?ps中绘制的线条图形是连续的,想要断开,做成一段一段的,该怎么实现呢?断开的又该怎么连接呢?下面我们就来看看ps断线效果的制作方法...

ps 线条断开 断线效果

PS画布不能拖动移动怎么解决? PS画布移动的方法

PS画布不能拖动移动怎么解决? PS画布移动的方法

PS画布不能拖动移动怎么解决?ps的画布是可以随意拖动的,但是在发布的时候,发现不能拖动,放大才能拖动,该怎么办呢?下面我们就来看看PS画布移动的方法,详细请看下文介绍...

PS 画布

AI如何将人物照片转成人物插画?AI将人物照片转成动漫插画教程

AI如何将人物照片转成人物插画?AI将人物照片转成动漫插画教程

当我们学会了这篇教程就可以将自己爱豆的照片绘制成插画的形式保存起来了,不只是爱豆哦,想学习的小伙伴们打开AI一起动手吧...

AI AI教程 照片转插画

cdr怎么设计有棱角的文字? cdr斜角立体字效果的实现方法

cdr怎么设计有棱角的文字? cdr斜角立体字效果的实现方法

cdr怎么设计有棱角的文字?经常使用cdr设计需要的字体,想要设计一款类似建筑棱角的文字模型,该怎么设计这种立体文字模型呢?下面我们就来看看cdr斜角立体字效果的实现方法...

cdr 立体字 字体设计

ps透视参考线在哪? PS快速画出一点透视参考线的技巧

ps透视参考线在哪? PS快速画出一点透视参考线的技巧

ps透视参考线在哪?ps中想要创建透视参考线,帮助绘图,该怎么创建呢?下面我们就来看看PS快速画出一点透视参考线的技巧,详细请看下文介绍...

ps 透视参考线 参考线

AI绘制3个人像矢量插画教程

AI绘制3个人像矢量插画教程

使用AI绘制人物的时候用到的图形会更多,如果想要给人物进行装饰一下细节必须把握好,今天咱们用AI来绘制3个不同的女人,一起来学习吧...

AI AI教程 人物矢量插画

感谢您留下宝贵的建议
问题类型:
提交
此文件需要VIP才能下载!
获取VIP全站模板任意下载
立即开通
注:下载文件较大,请耐心等待!

在线时间:9:00-21:00
点击咨询 常见问题 >
官方交流群:451642347
点击加入